Plant Care

Clematis Care

Clematis Care

Why Grow Clematis

Clematis plant are some of the most versatile blooms that you can grow in a garden.

Because they are climbers you can pretty much grow them anywhere as long as they have something to cling onto. This could be:

  • A trellis or wall panel
  • An obelisk, wigwam or climbing frame
  • Another plant

They take up almost zero ground space but will need room for the stems to grow and flourish. They are also one of the most satisfying plants to grow, beautiful blooms in a myriad of shapes sizes and colours which just add that wow factor to your garden.

This image has an empty alt attribute; its file name is PrincessDiana-1024x660.jpg

Types of Clematis

Clematis is a large group of plants which belong to the Ranunculaceae family. There are over 300 species and hundreds of hybrids. For the average gardener, Clematis varieties can be divided into eight separate groups. These in turn are organised into two main divisions, the Large Flowering and Small Flowering species.

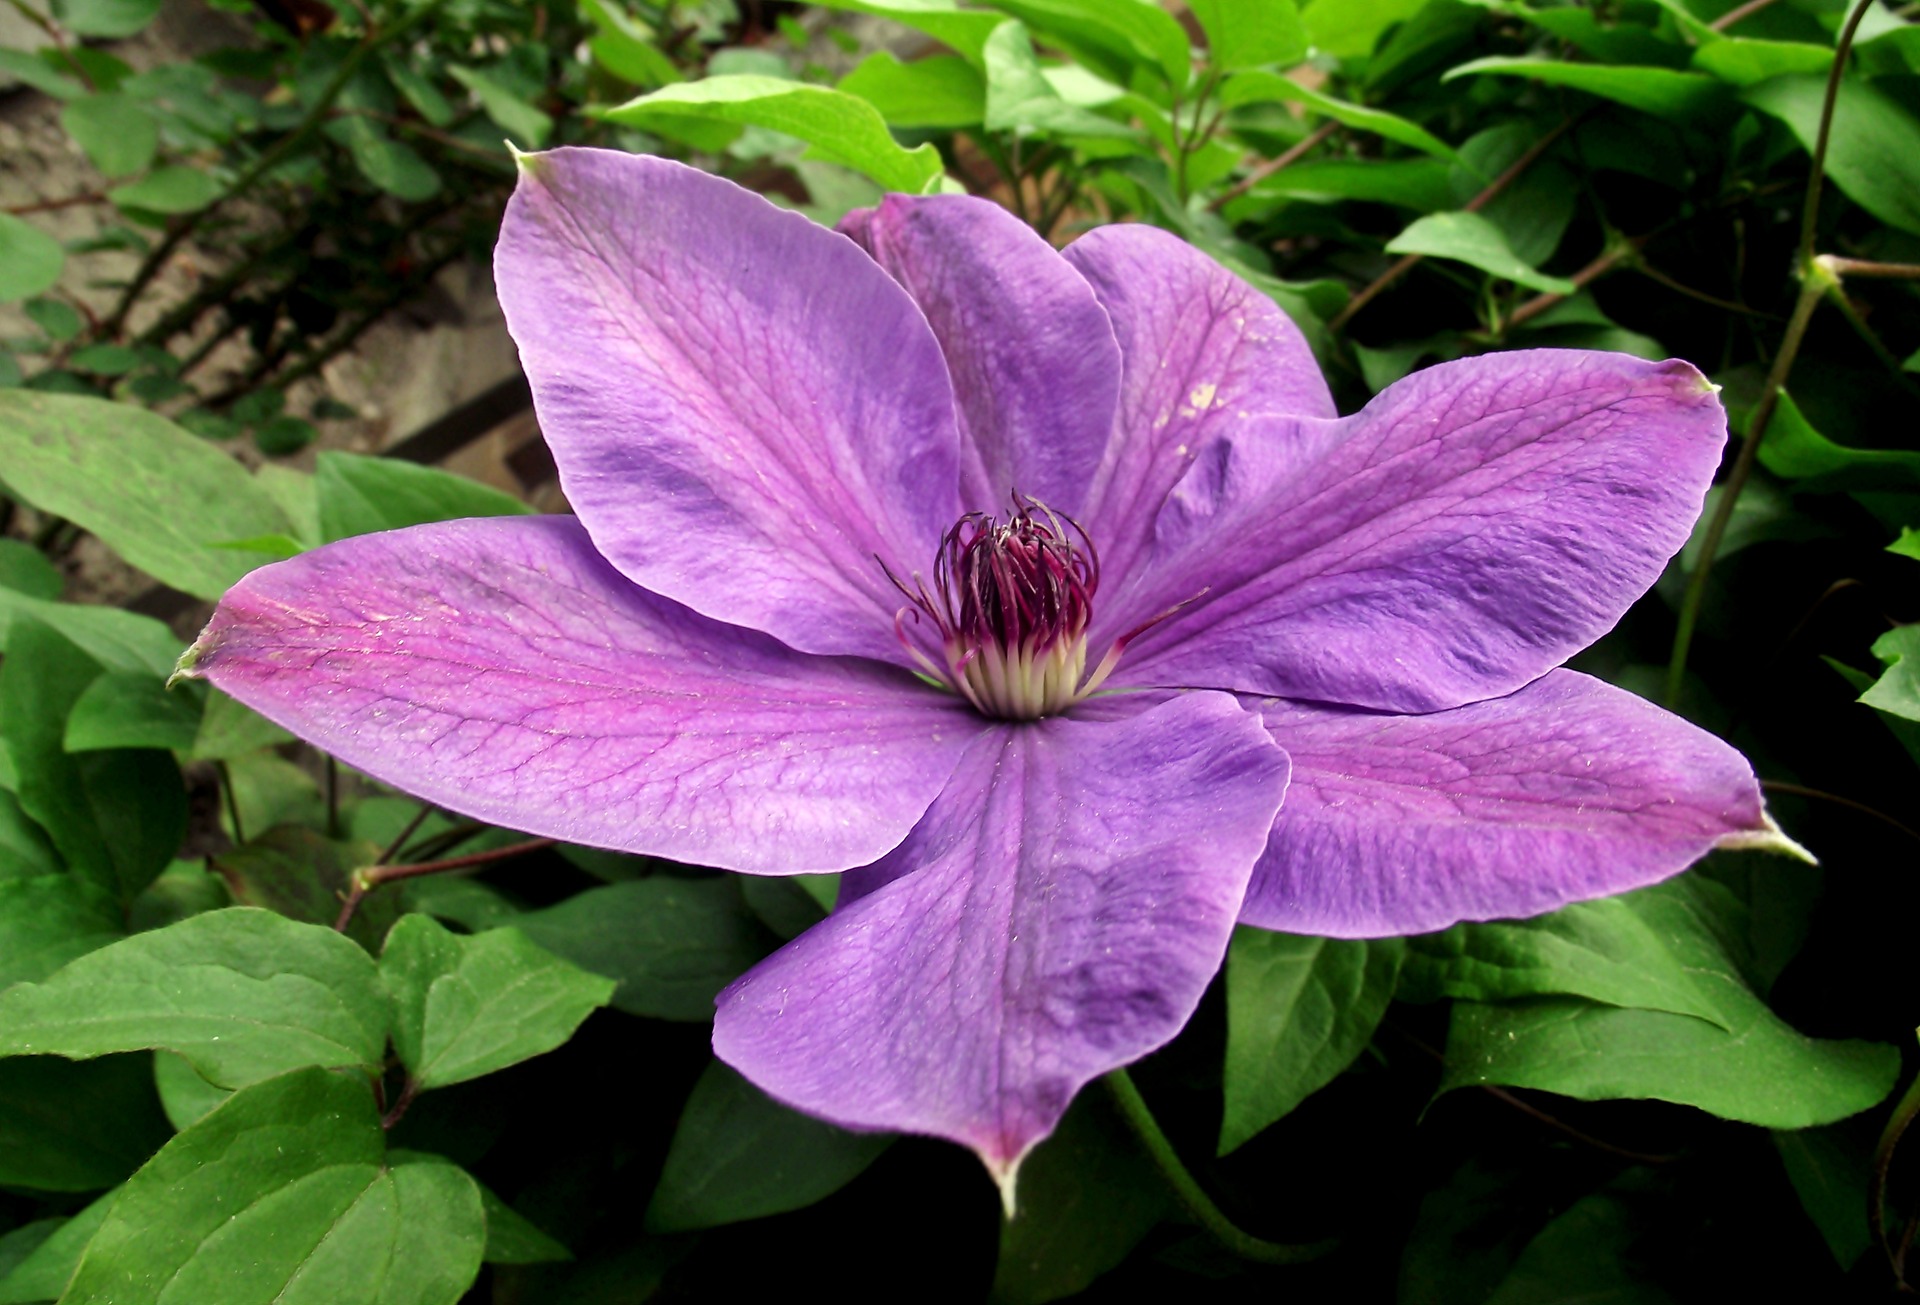
Large Flowering Clematis

These varieties are typically characterized their large, dramatic flowers, which are sadly, rarely scented. The roots of these plants are lace-like in appearance.

These Clematis plants are unfortunately prone to the fungal disease known as wilt.

Early Large-Flowered Group

This image has an empty alt attribute; its file name is 20170604_202304-1-1024x993.jpg
  • The flowers of this group are incredibly large, often 15-25 cm (6-10 in) across. These are star-shaped and may be single or semi-double blooms
  • Flowers come in a wide variety of colours, usually bloom in two waves initially late spring or early summer, then likely repeat flower in late summer and early autumn
  • Pruning Group 2
  • Notable Varieties
    • Clematis ‘Diamantina’
    • Clematis ‘Nelly Moser’
    • Clematis ‘The President’

Late Large-Flowered Group

This image has an empty alt attribute; its file name is Clematis%20Ville%20de%20Lyon2.jpg
  • Their flowers are impressively large, 13-20 cm (5-8 in) across usually star-shaped, in single, semi-double or double blooms
  • These clematis can reach up to 2-3.5 m (6-12 ft) in height
  • They usually bloom in two waves, early and mid summer on new wood, often repeat flowering again in late summer and early autumn
  • They are usually full sun or partial shade tolerant
  • The foliage of some of these clematis is susceptible to powdery mildew
  • Pruning group 3.
  • Notable varieties
    • Clematis ‘Ernest Markham’
    • Clematis ‘Perle d’Azure’
    • Clematis ‘Ville de Lyon’

Small Flowering Clematis

Small flowered Clematis are usually characterized an abundance of small flowers, which are often scented. The roots of the plant are fibrous in appearance. These plants are easy to grow and the foliage rarely suffers from wilt.

This main Clematis group is subdivided into six distinctive sub-groups each presenting very different sets of qualities.

Atragene Group

This image has an empty alt attribute; its file name is OIP.RFxhtap8rezPB2rjk-GfFAHaFj
  • This group of clematis contain varieties that are extremely hardy, undemanding and easy to grow
  • They’re also cold-hardy so can be grown on north and east facing walls
  • Profuse bloomers from mid to late spring and occasionally in late summer
  • The flowers produce ornamental, fluffy and silky seed-heads, which remain on the plant, adding further interest
  • They are gentle plants and do not smother their supporters
  • Pruning Group 1
  • Notable varities
    • Clematis ‘Pamela Jackson’
    • Clematis ‘Frankie’
    • Clematis ‘Markham’s Pink’

Clematis – Evergreen Group

This image has an empty alt attribute; its file name is 36370cv.jpg
  • The earliest Clematis to flower, the Evergreen group includes small-flowering clematis which provide gardeners with floral interest in winter
  • Blooming from midwinter onward lowering at a time when the garden has little to offer
  • Transform boundary walls and fences into leafy screens, the evergreen foliage remains handsome all year-round and providing multi-season interest
  • Pruning Group 1
  • Notable varities
    • Clematis ‘Apple Blossom’
    • Clematis cirrhosa var. balaerica

Herbaceous (or Integrifolia) Group

This image has an empty alt attribute; its file name is Q056XIjfAb8LeUX0JZGt0Bc0hFd3lm5Kt578cQjB.jpeg
  • This group contains easy to grow and long lived plants, these clamber over other plants in the border
  • They have no twining leaves (petioles) to help them climb and die to the ground at the end of each year
  • They bloom profusely over a long season, from early summer to early autumn, with the bonus of attractive foliage
  • Deadhead them after their first flush of blooms, they will bloom again within 30-45 days. You may enjoy 2 or 3 waves of colourful blooms
  • Pruning Group 3
  • Notable varieties
    • Clematis ‘Arabella’
    • Clematis x durandii
    • Clematis ‘Juuli’

Clematis – Montana Group

This image has an empty alt attribute; its file name is ggg-1024x576.jpg
  • The Montana group of clematis are the most vigorous of clematis varieties
  • Their flowers are but they are full of charm, fragrant and create an abundant and spectacular floral display
  • Strong growers, they’re great for arbors, trellises, pergolas and other garden structures. These need to be sturdy as these plants can get very big
  • Pruning Group 1
  • Notable varieties
    • Clematis ‘Elizabeth’
    • Clematis montana var. grandiflora
    • Clematis montana var. rubens

Clematis – Orientalis Group

This image has an empty alt attribute; its file name is yP9ab8YWUf7fOghXU7PFGOgzGvGNxLHcWpUHnSjV.jpeg
  • Originating from central Europe and Asia, this group comprises of species with bright yellow lantern or star-shaped flowers that are often nodding.
  • They bloom profusely from mid to late summer, even into late autumn.
  • Once the floral display is over the flowers are replaced with showy pom-pom like seed-heads.
  • Pruning Group 3
  • Notable varieties
    • Clematis ‘Bill MacKenzie’
    • Clematis serratifolia
    • Clematis tangutica

Clematis – Viticella Group

This image has an empty alt attribute; its file name is NKK4mMdyMwbrYOgkX0pQk1r1GM4yzokXrLyy8LiR.jpeg
  • This group of clematis originates from Southern Europe and produces varieties that are durable, easy-care, vigorous and free-flowering
  • They bloom profusely over a long period extending from midsummer to autumn
  • They can be grown in large containers if give enough room enough to grow and something to climb on
  • Pruning Group 3
  • Notable varieties
    • Clematis ‘Etoile Violette’
    • Clematis ‘Polish Spirit’
    • Clematis ‘Princess Diana’

Planting

It’s best to plant in early spring or mid autumn as it is warm and the soil is moist. This helps to establish good root development for your plant.

Avoid planting in waterlogged, frozen or drought inflicted soil.

Choosing a clematis

You are likely to purchase a clematis from a garden centre, nursery or even a supermarket. Always look for plants that have healthy foliage, a multitude of stems and have a good number of flower buds on them. I generally avoid plants that are already full of flower as you are likely to damage them when planting the specimen.

These plants are quite delicate, keep them securely fastened in your car when taking them home.

Preparing the site

  • Most clematis will comfortably grow in sun or partial shade, but avoid a very shady spot. Herbaceous varieties need to be in full sun.
  • Some varieties which include evergreen winter and spring-flowering specimens will need a sheltered spot.
  • Clematis need to keep their roots cool and moist, consider this when you work out your planting area.
  • Allow enough space for your plant to grow into as some clematis are very vigorous.
  • Herbaceous clematis are best grown through plant supports or into nearby shrubs
  • Climbing varieties will need something to cling onto such as a trellis, arbour, obelisk or panel.

Preparing the Plant

Before you plan the clematis, soak the root-ball in water for 30 minutes before you plant it.

Clematis are tolerant of most soil types but if you have sandy or clay soils dig in some organic matter to help improve the soils structure. Dig a hole twice as wide as the root-ball but depth will vary depending on the clematis type chosen.

If planting against a wall or fence, dig the planting hole so that the root-ball will sit around 20 to 30cm (8 to 12in) away from the wall, further out if there is an overhanging. Use a bamboo cane to help the plant reach its permanent support.

For large-flowered hybrid cultivars (early and late-summer-flowering) make sure the top of the root-ball is 5-7.5cm (2-3in) below the soil surface. This encourages new shoots to grow from below ground level, it also helps the plant to recover from Clematis wilt.

Plant all other clematis types with the root-ball just below the soil surface.

Clematis love to gave their heads in the sun and their feet in the shade

Try and plant the roots in a shady area if possible, if not add stones around the roots to protect them from the heat.

Clematis bought from garden centres come pre-attached to bamboo canes and secured by plastic ties. These will need to be very carefully removed before attaching the vine to its support.

Most Clematis (with the exception of Herbaceous varieties) will naturally attach themselves to their supports with their twining leaves (petioles). You can also tie the stems to their supports but be careful not to damage the delicate stems. I usually create a loose loop with garden wire to support the stem without squashing it.

Pruning

There’s an old saying regarding clematis:
“If it flowers before June, don’t prune”

The above quote is a really good guide if you are unsure of your clematis type.

  • If it flowers before early summer (June), leave it alone.
  • If it flowers from late June onwards, prune the plant in late February.

If you do know your Clematis type then you can find out which of the following three pruning groups it fits in.

Group 1

  • Officially these clematis shouldn’t need pruning however, as the plants get bigger they become more unwieldy
  • Regular pruning of clematis encourages strong growth and flowering and keeps the plant in check otherwise they become mass of tangled stems.
  • Prune your plants after they have flowered cutting back by up to one third. Always remember to cut to a healthy pair of buds.

Group 2

  • Prune in late winter or early spring (February)
  • Removing dead or weak stems before growth begins. Check each stems from the top down until you reach a pair of healthy buds, and cut just above them.
  • Avoid heavy pruning otherwise flowers may be lost
  • To encourage a second flush of flowers, prune back some stems by cutting to large buds or a strong side shoot immediately below the blooms.

Group 3

  • In February or March, cut back all the old stems to the lowest pair of healthy buds 15-30cm (6in-1ft) above soil level
  • If left unpruned, this group continues to grow and becomes top heavy
  •  If you have space, leave the plant to scramble over pergolas or walls
  • Note: Herbaceous Clematis can be cut back to near ground level

Diseases

Clematis Wilt

  • Clematis wilt is a fungal disease of clematis which mostly affects the large-flowered hybrid cultivars. The fungus causes rapid wilting and, in severe cases, can kill the whole plant
  • Leaves will have discoloured black spots and show marked drooping
  • If the wilting stems are carefully removed and cut back to a set of healthy leaves the plant will survive. Be careful to dispose of the diseased stems as these can infect other plants

Clematis Slime Flux

  • This is a nasty disease. Where Clematis wilt usually affects the odd stem, Slime flux will affect the whole plant.
  • The disease is characterised by a horrible slimy, crusty, smelly ooze coming from the stems
  • It is likely to be fatal to the plant, but it can be saved if you cut away all the stems affected by the infestation. If you are lucky new shoots will appear in the un-affected areas.

Feeding and Watering

  • Clematis are thirsty plants, they don’t like to dry out and can become prone to drought stress.
  • In hot spells keep them regularly watered – especially if they are in a container
  • Feed them with a Potassium rich fertiliser, a rose fertiliser, for example, is very good
  • Apply a layer of Mulch after feeding such as well-rotted manure, leaf mould or garden compost, to improve the soil and help conserve moisture
  • Feed container-grown clematis monthly during the spring and summer using a general-purpose liquid fertiliser.

Posted by Jonathan Norman in Clematis, Gardening Jobs, Plant Care, Planting Ideas, 0 comments
Chemicals & Roses

Chemicals & Roses

It started as a desire to stop using harmful rose sprays and having lots of them I wanted to mix my own from natural and organic sources to minimise harm to wildlife and bees. Now we have an International test going on.
The simplest thing to do is to grow disease resistant breeds. However, the most fragrant and beautiful roses I know of are prone to disease and need looking after. I do not mind the effort as the reward of beautiful roses and wonderful scent makes my heart sing.

The problem is that most of the treatments are harmful to wildlife and the environment and I am keen to use garden products that do no harm.
Probably the best known organic rose tonic is Uncle Toms. It is a very good product. Please read about it.

The Science Behind Uncle Tom’s® Rose Tonic

Amateur gardeners now have the opportunity to benefit from potassium phosphite, a nature-identical plant food. Widely used by professional growers the results have prompted recommendations from many of the leading members of the rose breeding and growing industry.
www.naturalgardensolutions.com

I am a passionate amateur rose gardener, it is not my day job, it is my safe place of sanity in a mad world. ‘How hard can it be to make my own?’ I thought one day, sounding like Jeremy Clarkson now.
There is a wealth of information out there. One article got me thinking:

Safe Rose Spray Recipe That Really Works – Horticulture

Looking for a safe rose spray to keep your plants healthy? Here’s the non-toxic recipe given to us by the gardeners at Hershey Gardens in Pennsylvania.
www.hortmag.com

Looking at the Ingredients

Roses like acidic soil, ideally a pH of 6-6.5. With a cheap pH meter you can test your soils pH and add Cider or White vinegar in a feed to adjust the soil pH and the roses will thrive. You should always combine the vinegar with feed to ensure the plant is nourished. Too much vinegar will also kill plants. Baking Soda is known to help treat fungal disease on plants and so the combination of Vinegar and baking soda is logical.


The addition of the oil is to coat the foliage so that moisture runs off. There is dry weather and high humidity it is creates the perfect conditions for powdery mildew. This basic combination of ingredients works quite well on roses.

Taking it a step further

I got the idea from David Austin Roses @DAustinRoses in a tweet about organic rose treatments that garlic exudes natural Sulphur which rose treatments need to be effective. So I am testing my concoction with Garlic concentrate from an Equine supplier as it is used in horses as a tonic. Garlic acts as an anti-septic, anti-flammatory, and fly repellent. Most importantly it is rich in natural sulphur which kills fugal spores.

Equimins Garlic Extract Liquid – Equimins

Concentrated Garlic Extract. Many times stronger than powder or granules. Daily use will support the respiratory system in a way no other single herb does.
www.equimins-online.com

I decided to replace the vegetable oil with Neem oil because it kills pests and fights powdery mildew and blackspot. I use good quality oil used as a carrier oil in organic cosmetics and essential oil blends

Virgin Neem Carrier Oil | Naissance

Naissance 100% pure, unrefined, cold Pressed Neem Oil. A rich oil, viscous oil, packed with fatty acids and Vitamin E. Cruelty Free and Vegan Friendly
naissance.com

For soap I use again a natural organic soap so that I know I am not adding chemicals from dish soap

Certified Organic Liquid Castile Soap | Naissance

Naissance 100% natural, Organic Liquid Castile Soap. A natural, deep cleansing soap made from premium vegetable oils. Cruelty Free and Vegan Friendly
naissance.com

Sulphur Rose

In 2023 I started adding Sulphur Rose to the mixture. Black spot (Diplocorpon Rosae) is a fungus that manifests itself on Rose Bushes as black spots fringed with yellow rings on both sides of the leaves.


As the disease spreads, the entire leaf goes from green to yellow and drops to the ground if unchecked the black spot can affect the entire rose garden leaving the appearance of many bare-naked plants.
Grerenacres Sulphur Rose

I use the above products because I know they are top quality, I am not paid to promote these products. My interest in this is purely as a hobby and to share my experience with others via Twitter. They also sell smaller quantities if you only have a few roses. The key is to use good quality products.

The Recipe

Mixing 1 Gallon or 4.5 Litres

  • 2 Tablespoons of Vinegar (15 ml)
  • 2 Tablespoons of organic liquid soap (30 ml)
  • 2 Tablespoons of Neem Oil (30 ml)
  • 3 tablespoons of Garlic Concentrate (45 ml)
  • 3 Tablespoons Baking Soda (45 grams)
  • 2 Spoons of Sulphur Rose powder 5ml

Making a bottle of 750 ml in a spray bottle:

  • 2.4 ml of Vinegar
  • 5 ml of organic liquid soap
  • 5 ml of Neem Oil
  • 5 ml of Garlic Concentrate
  • 7.5 grams Baking Soda
  • 1/2 scoop of Sulphur Rose

Mixing

I mix in a gallon sprayer and make sure I give it all a good shake before using. Ideally, it needs to be stored at room temperature and if the oil gets lumpy just put it in the airing cupboard or stand in a bucket of hot water for a while making sure it is cool before spraying.

Mixing Large Batches

Put all the ingredients except the baking soda into a 1 litre measuring jug. Add 400 ml of boiling water.
Carefully put the baking soda into the mixture do not stir or agitate, wait between spoons of baking soda for 30 seconds or so and gently stir.

Have a large bottle with a funnel ready, I use 1.5-litre water bottles. If the Bicarb fizzes up too much, quickly pour it into he the larger bottle. If this happens let it cool before putting it back in the measuring jug to accurately top up with water.

Leave for 15-20 minutes then top up to 1 Litre with hot water do not worry about the foam. Leave to cool then pour into spray unit or storage container and add 3.5 litres of water. I store this in 1 litre bottle of concentrate and add to spray unit before use.

If it is cold put the concentrate bottle into a bowl or bucket of hot water so that the oil melts and shake well.

Using Concentrate From I Litre bottle

If you use a small spray bottle 280 ml of the concentrate to 750 ml of water following the batch process above.

A note on spraying

The best time of day to spray is as the sun goes down. Do not water before. The leaves will be dry and the spray will be most effective. Do not spray just the surface of the leaves but underneath.


If you have any disease remove the diseased leaves and dispose of, do not compost and pick up any leaves around the base of the rose.


In these instances spray the stems and around the base, wash your hands and sterilise any secateurs or cutting tools to stop the spread of disease. We all have plenty of ant-bac wipes these days!

An Experiment

A group of Twitters gardeners are participating in an experiment to see how this goes on just one rose bush this season following this recipe. I have sent out my mixture so that we get consistent results and I will be posting more news on this.

Please do contact me via Twitter @JRRushden to discuss this and ask any questions.

Posted by Jason Richards in Plant Care, Roses, 0 comments
Mulching For Roses

Mulching For Roses

Mulching is a mysterious subject and quite often the views of gardeners differ on what is best. The science of soil is that what works in one part of the country may be quite different in another. You start then to go far too technical for my limited gardening time.

My purpose is not so much to be the ‘expert’ but to explain how my mulches work for me and the results I get in my garden.

There are essentially two parts to a mulch and in my view three. There we go I am at odds with thousands of gardeners now!
Slightly different methods are used in agriculture and I am speaking about Roses.

The Roots

The most important thing is to plant well to ensure the roots can breathe and get nourishment.

I always use Mycorrhizal Fungi to develop good roots and is a natural way to grow strong plants. The fungi work with the plant in a symbiotic relationship; the fungi take sugars from the plant and give back nutrients and moisture, the most valuable being phosphorus which helps the development of good roots.

I have also been using Richard Jacksons Root Booster that contains Mycorrhizal Fungi and additionally naturally occurring Humates. These Humates are naturally occurring mineral deposits of organic matter made over thousands of years and a great fertiliser for plants. It also contains feed.

Layer 1

Around the base of the plant I use slow releasing plant feed. David Austin has a really good natural fertiliser that slow releases. It is not always available and I have been using Richard Jacksons ‘Easy Feed’. I have had astonishing results using Richard Jacksons products. Secondly, I used seaweed granules at this level to slowly feed into the roots. Seaweed is both a fertiliser and natural tonic, It helps chlorophyll production and plant growth hormones that help both the roots and branches.

Layer 2

Consists of really good compost mixed four compost to one topsoil with one good pine bark chippings that I put through the garden shredder to make them fine. I measure using a 750 gram tub for precision and 100 grams of Seaweed granules mixed up and cover the base of the plant with 5 cm of this concoction. What it does is to leach and rot down to the roots over the season. Roses will grow anywhere if fed well from above into the roots. This year I am putting 3 bags of ground fresh garlic per barrow of compost mulch. Garlic helps keep aphids and fungal diseases at bay, is said to improve fragrance and the size of the blooms.

Layer 3

The top the layer is either Pine Nuggets, Gravel or even slate chippings. I have a large gravelled area and purely randomly after a visit to David Austin I had two extra roses and nowhere to put them. So I dug two big deep holes in the gravel and planted them there. They have thrived with good planting technique and annual mulching. I now have 6 roses in the gravel area all doing extremely well.
Both gravel and Pine nuggets act to retain moisture in the soil and protect the roots from the winter frosts. The bark gradually rots and adds to the feeding process

Steps To Mulching Well

  1. Clear any dead or diseased leaves from the surface
  2. Rake back any existing mulch about 12 inches around the base
  3. Apply the compost layer
  4. Replace the gravel or bark and top up with fresh material

Products I Use

David Austin Mycorrhizal Fungi – Rose Food, Sprays, Compost – Rose & Garden Accessories

Buy David Austin Mycorrhizal Fungi from David Austin. Our Accessories have been expertly chosen for their quality and practicality by our rose experts.
www.davidaustinroses.co.uk

David Austin

Root Booster – Richard Jackson Garden

Formulated from 3 special ingredients and 100% natural, Root Booster can help you grow healthier, bigger and better plants.
www.richardjacksonsgarden.co.uk

Root Booster

David Austin Rose Food – Rose Food, Sprays, Compost – Rose & Garden Accessories

Buy David Austin Rose Food from David Austin. Our Accessories have been expertly chosen for their quality and practicality by our rose experts.
www.davidaustinroses.co.uk

Easy Feed Slow Release Plant Food 750g – Richard Jackson Garden

Feeding your plants simply couldn’t be easier – just add Easy Feed at planting time, or to established containers, and the granules gradually release Flower Power nutrients for up to 6 months!
www.richardjacksonsgarden.co.uk

Equimins Straight Herbs Seaweed – Equimins

Contains minerals and trace elements. Adds lustre to the coat and can help improve hoof condition.
www.equimins-online.com

Equimins Straight Herbs Seaweed

Articles

Mycorrhizal fungi / RHS Gardening

Mycorrhizas are fungal associations between plant roots and beneficial fungi. The fungi effectively extend the root area of plants and are extremely important to most wild plants, but less significant for garden plants where the use of fertilisers and cultivation disrupts and replaces these associations.
www.rhs.org.uk

Mycorrhizal fungi

Gardening experts spray roses with essence of GARLIC for extra growth | Daily Mail Online

It’s been a good year for the roses down at the Royal Horticultural Society’s garden in Surrey. Just take a look at these magnificent blooms, which have grown to twice their normal size.
www.dailymail.co.uk

Garlic spray

Seaweed – A Mystery and a Miracle for Plants

Carolyn Elgar Master Rosarian, Orange County Rose Society Roses & You, June 2020 Want to give your rose garden a real treat? Give it a dose of seaweed and it will benefit in many ways, including some we don’t know much about. Your rose bushes will flourish and reward you with increased healthy growth. Seaweed has been used for food and fertilizer for hundreds of years. Particularly in areas with easy access to ocean beaches, such as Japan and China, seaweed was spread throughout the garden as a
www.rose.org

Seaweed article
Posted by Jason Richards in Plant Care, Roses, 0 comments