Planting for Pollinators
Bees and other pollinating insects are perhaps the most important animal for our own welfare on the planet.
Across the world, bees pollinate 80% of the world’s plants which includes 90 different food crops such as like cocoa, tomatoes, almonds, and apples. It is estimated that 1 out of every 3 bites of food that you eat is thanks to bees.

Global Decline in Insect Numbers
Sadly across the world over 40% of all insects are now in decline with a third of those endangered. Analysis suggests a quarter of insects could be wiped out within just a decade. There are many factors which are contributing to this. Among these are:
- Pollution,
- Use of insecticides on crops,
- Global warming and
- Loss of habitat
It is loss of habitats that is probably the most concerning issue especially for rarer and more specialised insects. Urbanisation, deforestation and industrial expansion have fragmented the natural places where insects once thrived.
This is very noticeable in town and city environments where roadways, pavements and paved over front gardens limit the natural resources that allow bees and other insects to thrive.
Gardening For Bees
All is not lost for our six-legged friends. With a little bit of help from the gardening community bees can thrive again, and what’s more we get to have the loveliest of gardens to view them in.
Here is a list of fifteen of the best plants you can add to your garden that will encourage bees and other pollinators. What’s more all of these plants are easy to grow, require minimal maintenance and look absolutely stunning in the garden border.
So what are you waiting for, pop some of these plants in the border to help the bees and at the same time you enjoy a beautiful summer display of flowers. It’s a win-win for them and us.
Achillea

- Achillea millefolium (Common yarrow) is a perennial wildflower, typically found growing in grassland and roadsides. It has feathery, aromatic leaves and flat white flowerheads, which are attractive to a wide range of pollinators, notably hoverflies. Cultivated varieties come in a array of colours and heights.
- Spread: 50cm
- Height: 50cm
- Aspect: Full Sun
- Soil: Chalky, Loamy and Sandy
Flowering Period:

Agastache

- Another fantastic plant loved by bees. Agastaches are perennials from North America, China and Japan, they grow in poor, soil and dry conditions. Perfect for gravel, Mediterranean or prairie gardens, they may also be grown in containers on a sunny patio or as part of a cottage scheme.
- These are brilliant plants for bees. Grow Agastache in full sun and a well-drained soil and let the old flower spires remain throughout winter to provide interest. In colder regions, protect from frost.
- Spread: 60cm
- Height: 90cm
- Aspect: Full Sun
- Soil: Chalky, Loamy and Sandy
Flowering Period:

Alliums

- Alliums are incredibly long-lived bulbous perennials which are loved by bees. Alliums look fantastic when planted in large groups and make excellent cut flowers.
- Grow alliums among other low-growing herbaceous plants which will hide their unsightly strappy foliage after flowering. Let allium foliage die down naturally after blooming and consider leaving the flowerheads in place as they look attractive in their own right, particularly in winter
- Spread: 15cm
- Height: 90 – 150 cm
- Aspect: Full Sun
- Soil: Chalky, Clay, Loamy, Sandy (will tolerate most soil types)
Flowering Period:

- Most allium varieties will flower for four to six weeks. By planting a succession of bulbs in your garden you can prolong the flowering period over several months. Click here and here for further details of what to plant when.
Astrantia

- Astrantias, also known as masterworts or Hattie’s pincushion, are fabulous cottage- garden or mixed border plants with a range of different colours. Will grow in sunny and partial shaded sites and can handle moist soils, making them a valuable asset in any border.
- Spread: 45cm
- Height: 90 cm
- Aspect: Full Sun, Partial Shade
- Soil: Chalky, Clay, Loamy, Sandy (will tolerate most soil types)
Flowering Period:

Camassia

- Camassias come from North America and are sometimes known as wild hyacinths. They’re very striking plants when in flower, long-lived and will naturalise amongst long grass or in wildflower gardens. By growing different varieties of Camassia together in drifts you can ensure the flowering season for these bulbs lasts from May until July.
- Spread: 30 cm
- Height: 90 cm
- Aspect: Full Sun, Partial Shade
- Soil: Chalky, Clay, Loamy, Sandy (will tolerate most soil types)
Flowering Period:

Cotoneaster horizontalis
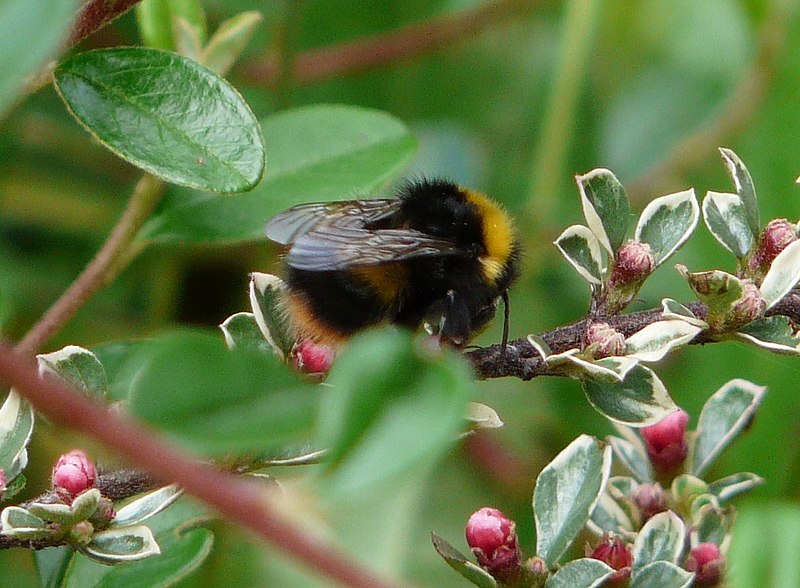
- Cotoneaster horizontalis is a fantastic plant to grow as a hedge or train up a wall. It has a characteristic herringbone pattern to its stems, which develop into a decorative basketwork as it matures.
- It can be grown in both full sun and shade but the neat pink flowers and bright red berries are more prolific in full sun. The flowers are a magnet for bees and the berries are eaten by birds.
- In the autumn, C. horizontalis has excellent late colour, with its small round leaves turning into a beautiful coppery hue.
- Spread: 180 cm
- Height: 50 cm
- Aspect: Full Sun, Partial Shade
- Soil: Chalky, Clay, Loamy, Sandy (will tolerate most soil types)
Flowering Period:

Digitalis

- Digitalis purpurea or the common foxglove is one of the most beloved cottage garden plant. The tubular, bell-shaped flowers are loved by bees, especially larger bumblebee species such as Bombus terrestris. Most foxgloves are biennial, meaning they put on root and foliage growth in year one, and then flower and set seed in year two, before dying. However there are some perennial varieties.
- Most foxgloves prefer dappled shade which is similar to the woodland environments they naturally grow in.
- There are many different types of foxglove available in a variety of shades, here are a few examples:

Digitalis purpurea – the native foxglove. Tall spires of pink dark pink flowers in June and July. Height 2m

Digitalis purpurea ‘Sutton’s Apricot’ – an extremely pretty variety with apricot/pink flowers. Height 1.5m

Digitalis lutea –pale yellow flowers in June and July. A perennial that reaches 60cm in height

Digitalis purpurea ‘Excelsior Group’– biennial plants that offer white, pink or mauve flowers. Height 2m

Digitalis parviflora – small, brown flowers that are tightly packed onto the flower spike. A perennial that flowers from May to July. Height 60cm

Digitalis grandiflora – perennial foxglove with large, warm-yellow flowers. Height 80cm

Digitalis purpurea ‘Illumination Pink’ – an incredibly vibrant foxglove with bright pink flowers with peachy orange centres. Flowers May to August. Height 90cm.
- Spread: 40 – 50 cm (depending on variety)
- Height: 60 – 180 cm (depending on variety)
- Aspect: Full Sun, Partial Shade
- Soil: Chalky, Clay, Loamy, Sandy (will tolerate most soil types)
Flowering Period:

Most Digitalis cultivars flower from late May to July with some varieties flowering into August.
Echinacea purpurea

- Echinacea purpurea has star status in the late summer garden. It has wonderful pink, daisy-like flowers with a large, cone-shaped centres. Its perfect for growing in drifts among the border or among grasses and rudbeckias in a prairie-style planting scheme, and is extremely attractive to pollinators. Its flowers are very long-lived and are superb for cutting. There are many different varieties each with its own distinctive height, colour and size of cone.
- Spread: 50 cm
- Height: 120 cm
- Aspect: Full Sun, Partial Shade
- Soil: Chalky, Loamy, Sandy
Flowering Period:

Geranium ‘Rozanne’

- Hardy geraniums or Cranesbill are popular perennial border plants that come in shades of pink, purple and blue. They’re easy to grow, thrive in sun and shade and flower for months on end. They offer a long season of pollen and nectar for a number of pollinators, particularly honey bees.
- Geranium ‘Rozanne’ is one of the most striking of the Cranesbills. It bears beautiful deep purple flowers that contrast perfectly with its mid-green foliage. It’s perfect for ground cover at the front of borders. It was also voted the ‘Plant of the Centenary’ to mark 100 years of the RHS.
- Spread: 100 cm
- Height: 60 cm
- Aspect: Full Sun, Partial Shade
- Soil: Chalky, Clay, Loamy, Sandy (will tolerate most soil types)
Flowering Period:

Knautia arvensis
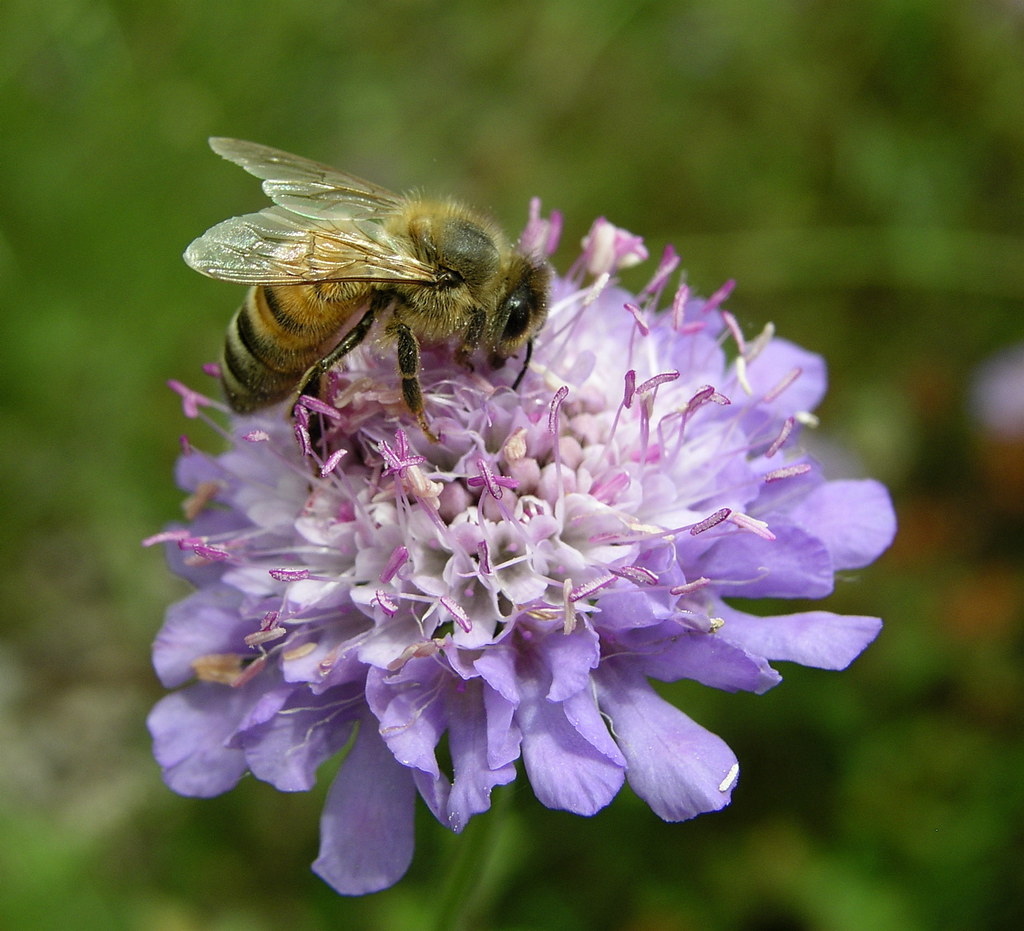
- Knautia arvensis or the Field Scabious is a beautiful and attractive wildflower. Pale lilac pin-cushion flowers adorn long wiry stems. It’s perfect for the herbaceous border and its blooms are adored by bees and butterflies. It also makes an excellent cut flower.
- Spread: 40 cm
- Height: 100 cm
- Aspect: Full Sun
- Soil: Chalky, Loamy, Sandy
Flowering Period:

Lavandula ‘Munstead’

- Lavandula angustifolia ‘Munstead‘ commonly known as English Lavender is a Mediterranean evergreen shrub, grown for its fragrant leaves and bee-friendly flowers. These are brilliant plants to grow in wildlife gardens, cottage gardens or even formal gardens. They can be grown in the border, planted as companions to shrub roses or used as a low-growing hedge. They also happily thrive in pots.
- They love an open site in full sun coping cope very well with drought conditions. They also love a well-drained, neutral to alkaline soil and can cope with temperatures down to about -15°C.
- Spread: 80 cm
- Height: 80 cm
- Aspect: Full Sun
- Soil: Chalky, Loamy, Sandy
Flowering Period:

Lonicera nitida ‘Red Tips’


- Lonicera nitida ‘Red Tips’ is, as it’s Latin name suggests, a form of Honeysuckle. However unlike its showier cousins, Lonicera nitida makes for a compact mostly rounded evergreen shrub. It has tiny, broadly ovate, red-flushed, dark green leaves which are noticeably reddish-purple when young, hence the name ‘Red Tips’. It looks remarkably similar to Cotoneaster horizontalis and also makes a fantastic wall shrub. The flowers are quite insignificant, tiny creamy-white affairs dangling vertically down from the branches of the bush. But despite their inconsequential nature, these flowers pack a huge punch, attracting bees in their dozens.
- Spread: 150 cm
- Height: 150 cm
- Aspect: Full Sun, Partial Shade
- Soil: Chalky, Clay, Loamy, Sandy (will tolerate most soil types)
Flowering Period:

Nepeta

- Nepeta or catmints add that lovely, soft, floppy, gentle touch to cottage gardens and more formal landscapes. There are many varieties to choose from that will suit different sizes of garden. Nepeta racemosa ‘Walker’s Low’ is a larger variety of catmint suitable for larger more countrified gardens. For smaller, more urban gardens Nepeta ‘Chettle Blue’ is a good choice as is the smaller (and wonderfully named) Nepeta x faassenii ‘Purrsian Blue’.
- All these plants have deep violet blooms which contrast with the fresh green leaves and are immensely popular with bees and other pollinators.
- Spread: 50 cm
- Height: 50 cm
- Aspect: Full Sun, Partial Shade
- Soil: Chalky, Clay, Loamy, Sandy (will tolerate most soil types)
Flowering Period:

Penstemon

- Penstemons are absolutely invaluable garden plants for the late-summer and autumn border. They have a very long flowering season and are immensely popular with bees. There are many different varieties of penstemon. Some are suited to an alpine garden but the majority are at happiest in the heart of a herbaceous border.
- If you want instant colour in your late summer border then penstemons are the answer. Plant in groups of three or five for impact, these wonderful plants will flower until the first frosts.
- There are many different types of penstemon available in a variety of shades, here are a few examples:

Penstemon ‘Sour Grapes’ – stunning, with almost luminous pale purple blooms. Flowers from June to October. Reaches a height of 60cm

Penstemon ‘Andenken an Friedrich Hahn’ (commonly known as ‘Garnet’ ) – Fabulous crimson flowers from June to September with narrow dark green leaves. Height to 75cm

Penstemon ‘Raven’ – Fabulous dark maroon flowers from June to October. Reaches a height of 100cm

Penstemon ‘Osprey’ – Pink and white flowers from June to October. Height of 90cm
Salvia nemorosa ‘Caradonna’

Salvia nemorosa ‘Caradonna’ is a perennial sage which looks wonderful in ornamental borders alongside Geraniums, Penstemon, Achillea and Echinacea. It produces summer-long displays of spiky, nectar-rich flowers and is loved by bees and other insects alike. Plant in sinuous drifts through your perennial border.
- Spread: 60 cm
- Height: 75 cm
- Aspect: Full Sun, Partial Shade
- Soil: Chalky, Loamy, Sandy
Flowering Period:







Recent Comments